2. Using Input Devices: Gamepad Controller
2.1. Learning Objectives
This tutorial introduces how to use a gamepad controller as human input device (HID) for interacting with a simulation in Omniverse Isaac Sim. After this tutorial, you will know how to map inputs from a gamepad to operate a mobile robot in simulation.
10-15 Minute Tutorial
2.2. Getting Started
Prerequisites
Please review the Essential Tutorial series, especially Hello Robot, prior to beginning this tutorial.
This tutorial requires an XBox controller to run. Other gamepads may function, however their bindings may be different than this tutorial.
This tutorial demonstrates how to drive a NVIDIA Kaya robot using a gamepad controller. The Kaya is a three-wheeled holonomic drive robot that is designed to be as accessible as possible. It is made of 3D-printed parts and hobbyist components, and features a RealSense depth camera for mapping, localization, and object recognition. An on-board IMU and position feedback from the wheel motors provide accurate odometry information. The Kaya’s sensor array and omni-directional motion can all be simulated in Omniverse Isaac Sim. Let’s learn how:
Begin by connecting the gamepad controller to the PC running Omniverse Isaac Sim.
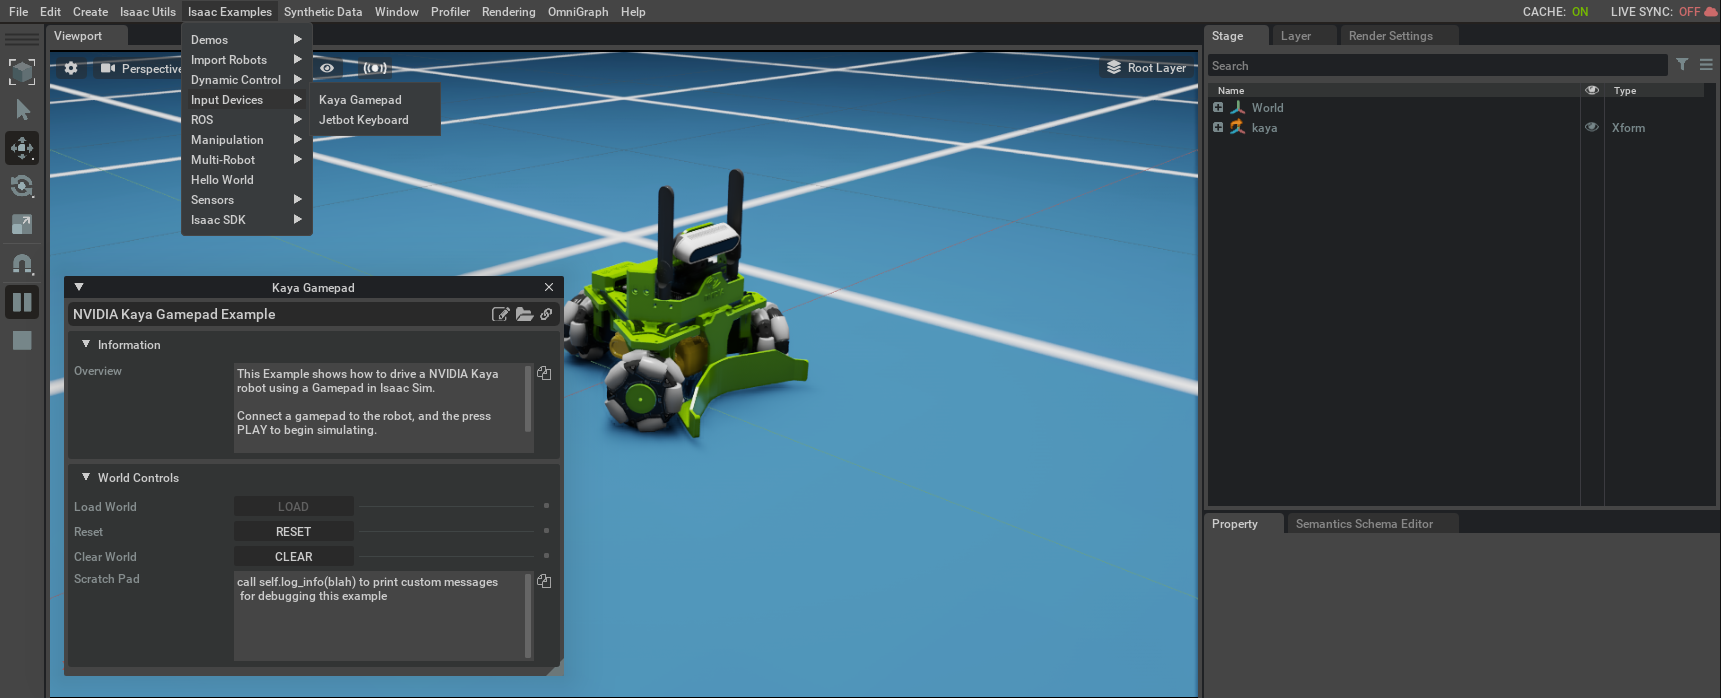
Next, open the Kaya Gamepad example: go to the top Menu Bar and Click Isaac Examples > Input > Kaya Gamepad.
Press the LOAD button to load a Kaya robot into the scene.

A Kaya robot and the window for the Kaya Gamepad example extension should now be visible in the workspace. Next, let’s examine the source code for this example.
2.3. Gamepad Extension
Click the Open Source Code button to launch the source code for editing in Visual Studio Code, and open the file kaya_gamepad.py.
The imports section of the code add the necessarily libraries for loading and controlling a Kaya robot.
The library omni.isaac.gamepad is what provides the gamepad binding interface for mapping user input to robot joints and drives.
1 2 3 4 5 6 7 8 | import carb
import omni.ext
import numpy as np
from omni.isaac.kaya import Kaya
from omni.isaac.kaya.controllers import HolonomicController
from omni.isaac.examples.base_sample import BaseSample
from omni.isaac.gamepad import _gamepad, GamePadAxis
from omni.isaac.core.utils.viewports import set_camera_view
|
The __init__ function initializes the default action commands, gains, and dead zone for the example.
1 2 3 4 5 6 7 | def __init__(self) -> None:
super().__init__()
self._controller = None
self._command = [0.0, 0.0, 0.0] # Default Actions (No Motion)
self._gains = (40.0, 40.0, 2.0) # Default Gains
self._gamepad_deadzone = 0.2 # Dead Zone to Filter Input
self._gamepad = None
|
The setup_scene function adds a Kaya robot to the World.
1 2 3 4 5 6 7 8 9 10 | def setup_scene(self):
world = self.get_world() # Get the World
self._kaya = world.scene.add( # Add a Kaya to the World Scene
Kaya(
prim_path="/kaya",
name="my_kaya",
position=np.array([0, 0.0, 2.0]),
orientation=np.array([1.0, 0.0, 0.0, 0.0]),
)
)
|
The setup_post_load function add a Gamepad Event callback and a Physics Step callback.
1 2 3 4 5 6 7 8 9 | async def setup_post_load(self):
world = self.get_world() # Get the World
self._kaya = world.scene.get_object("my_kaya") # Get the Robot from the World
self._controller = HolonomicController(name="simple_control") # Create the Controller
self._gamepad = _gamepad.acquire_gamepad_interface() # Grab the Gamepad handle
self._gamepad.bind_gamepad(self._sub_gamepad_event) # Bind Callback to Gamepad Event
self._world.add_physics_callback("kaya_step", callback_fn=self._on_sim_step) # Add Callback to Physics Step
await self._world.play_async() # Start the Simulation
return
|
The Gamepad Event callback _sub_gamepad_event updates the Actions being set for each of Kaya’s three wheels.
1 2 3 4 5 6 7 8 9 10 11 12 | def _sub_gamepad_event(self, axis, signal): # When there's a Gamepad Event
if abs(signal) < self._gamepad_deadzone: # Filter Out Small Inputs
signal = 0
if axis == GamePadAxis.eLeftStickY: # Set the Action Command for each Wheel
self._command[0] = signal * self._gains[0]
elif axis == GamePadAxis.eLeftStickX:
self._command[1] = -signal * self._gains[1]
elif axis == GamePadAxis.eRightStickX:
self._command[2] = -signal * self._gains[2]
else:
pass
|
The setup_pre_reset and setup_post_reset functions reset the controller before reset is called on the scene as well as removing and adding the physics callback.
1 2 3 4 5 6 7 8 9 | async def setup_pre_reset(self):
self._controller.reset() # resets the controller
self._world.remove_physics_callback("kaya_step") # Removes the physics callback
return
async def setup_post_reset(self):
self._world.add_physics_callback("kaya_step", callback_fn=self._on_sim_step) # Adds the physics callback
await self._world.play_async()
return
|
And finally the Physics Event callback _on_sim_step applies the Actions to the Kaya’s holonomic controller.
1 2 3 4 | def _on_sim_step(self, step): # When Simulating
self._kaya.apply_wheel_actions( # Send the Actions to the Controller
self._controller.forward(self._command[0], self._command[1], self._command[2])
)
|
And with these few core functions, we can drive the Kaya around in simulation:
Extra Practice
Use the
eLeftTriggerandeRightTriggerto change the gains sent to the robot.
2.4. Summary
This tutorial covered the following topics:
Using the
omni.isaac.gamepadAPIUsing Event Callbacks
Adding Robots from a Nucleus Server
2.4.1. Next Steps
See the other Input Devices tutorial in our Advanced Tutorials section, Using Input Devices: Keyboard, to learn how to integrate keyboard input into simulations in Omniverse Isaac Sim.
2.4.2. Further Learning
For a more in-depth look into the concepts covered in this tutorial, please see the following reference materials:
Gamepad Extension
See the Isaac Gamepad API Documentation for complete usage information.
See the Gamepad Manipulation Extension Manual for full implementation details.